Showing posts with label Cookies. Show all posts

Saturday, September 25, 2010

White Chocolate Cinnamon Toast Crunchers

Posted by Laura at 9:07 PM 2 comments
These cookies, which I've had my eye on for quite a while, were good but I would defintely make a couple of changes:

1) Decrease the amount of white chocolate chips from 1 bag (approximately 2 cups) to 1 cup. White chocolate chips are incredibly sweet and, while I normally have quite the sweet tooth, these were too much for me.

2) Add the Cinnamon Toast Crunch whole, rather than cruching it up slightly. When I added my crushed cereal to my stand mixer, the cereal got crushed up even more so that the cereal was barely noticible in the cookie.

3) Increase the Cinnamon Toast Crunch Cereal by about a half a cup.I think the cookies could benefit from a little more Cinnamon Toast Crunch flavor.
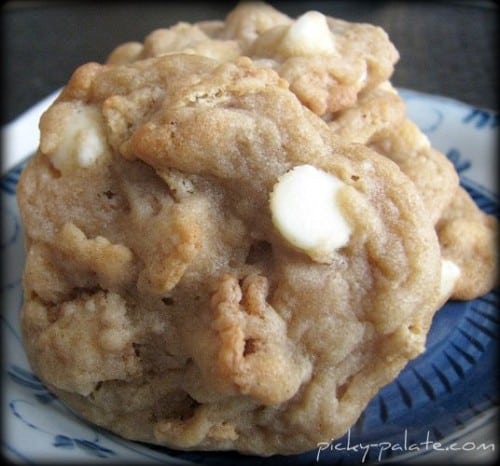

IMG_3969picnik.jpeg

Photo Courtesy of Picky Palate


White Chocolate Cinnamon Toast Crunchers
(Source: Picky Palate)

2 sticks softened butter
1 Cup packed brown sugar
3/4 Cup granulated sugar
2 large eggs
1 Tablespoon real vanilla extract
2 1/2 Cups all purpose flour
1 Cup Cinnamon Toast Crunch Cereal, slightly crushed up
1 teaspoon baking powder
1/2 teaspoon salt
1 bag white chocolate chips


1. Preheat oven to 350°F. In a stand or electric mixer beat the butter and sugars until light and fluffy. Slowly beat in the eggs and vanilla until well combined. In a large bowl combine the flour, Cinnamon Toast Crunch Cereal, baking powder and salt. Slowly add to wet ingredients along with the white chips until just combined. With a medium cookie scoop, scoop dough and place onto a silpat or parchment lined baking sheet 1 1/2 inches apart. Bake for 9-12 minutes or until edges just start to turn golden brown.

2. Let cool for 5 minutes on baking sheet then transfer to a cooling rack to finish cooling. Enjoy with a tall glass of milk!

3 dozen cookies

Saturday, September 18, 2010

(Not Really) Lofthouse Cookies

Posted by Laura at 4:23 PM 0 comments
You've heard of Lofthouse Cookies before, right?

Those incredible addictive cookies that are white as snow, soft, almost as crumbly as polvorones, and have a lot of flavor from whatever blend of extracts are used?

[loft+cookies.jpg]

Yeah, those.

I tried to recreate them this weekend for a bridal shower I was hosting. I did a lot of internet research before starting. I can't tell you the reasoning behind which recipe I finally chose, other than that it boasted that they tasted "exactly like Lofthouse Cookies."

Well, it wasn't entirely true.

They were not as puffy as Lofthouse Cookies. They were also not as soft, and the edges were almost crunchy and I defintiely didn't overbake them (You know how I am with cookies). You could taste the oil in the cookie, so much so that I had to add extra vanilla to try to balance out the flavor.

So, as of right now, the hunt is still on. Next time I will either be trying the version found on Cookie Maddness or Cooking with Carrie.


Melt-in-Your-Mouth Sugar Cookies
(Source: bon appécookie)

Cookies:
1/2 cup (1 stick) unsalted butter, softened
1/2 cup oil
1/2 cup granulated sugar
1/2 cup powdered sugar, sifted
1 egg
1/2 tsp vanilla extract
1/2 tsp cream of tarter
1/2 tsp baking soda
1/2 tsp salt
2 cups all purpose flour

Frosting:

2 1/2 cups powdered sugar, sifted
1/4 (1/2 stick) unsalted butter softened
1/4 tsp salt
1 tsp vanilla extract
3 tbsp half and half (or whole milk)
5 drops food coloring

1. Preheat the oven to 375°F.

2. Cream together the butter, oil, and sugars. Add the egg and vanilla and beat well. In a separate bowl sift together the remaining dry ingredients. Combine with the wet ingredients and mix until fully incorporated.

3. Refrigerate dough or roll into evenly-sized balls and place on cookie sheet. Bake for 8-10 minutes. Leave on baking sheet for a few minutes before transferring to a wire rack to cool completely.

4. To make the frosting, beat together all ingredients well, adding milk and food coloring last for desired thickness and color. Frost cooled cookies generously and add decorations as desired.

Wednesday, June 16, 2010

Reese's Pieces Chocolate Chip Cookies

Posted by Laura at 6:10 PM 1 comments
When I originally picked these out to make for my coworker Jeff, I though they were peanut butter cookies. I'm not sure why, since clearly they're not. Despite that little self-induced letdown, they were still very good.

Photo courtesy of Jenny @ Picky Palate


Reese's Pieces Chocolate Chip Cookies
(Source: Picky Palate)

1 stick real butter, softened
1/2 cup butter flavored shortening
3/4 cup sugar
3/4 cup brown sugar
2 large eggs
1 1/2 tsp real vanilla
2 cups all purpose flour
1/4 cup ground quick oats (in food processor or blender)
1 tsp baking soda
1 tsp salt
1/2 Bag Reeses Pieces mini baking pieces
1/2 Bag Semi-Sweet chocolate chips (I used mini chocolate chips)


1. Preheat oven to 375°F. Place butter, shortening and sugars in a stand mixer and mix until smooth and creamy. Slowly beat in eggs and vanilla.

2. Place flour, oats, baking soda and salt in a large bowl. Slowly pour into wet mixture on very low speed until just combined. Hand stir in Reeses and chocolate chips.

3. Drop onto an ungreased baking sheet and bake for 9-11 minutes until just golden around edges.


3 dozen cookies

Monday, June 7, 2010

X-Rated Goodies

Posted by Laura at 2:24 PM 0 comments
One of my college roomates, Melanie, is getting married next month. Another one of my other college roomates, Jessica, and I were put in charge of baking some erotic treats for the bachelorette party weekend. Here's just a quick glimpse of our creations:

Penis Cake:


Cupcakes:


Fruity Condoms:


We made these by wrapping gummy Peach O's in fruit roll ups. These were delicious!

Condom Cookies:


We made these by pressing circles of white sugar cookie dough into pink squares of cookie dough. We then wrote on the cookies with icings.

Monday, May 10, 2010

Brown Sugar Chocolate Chip Cookies

Posted by Laura at 8:25 AM 0 comments
These might just be my new favorite cookies. The texture of these cookies is chewy but not thick and the brown sugar and vanilla give these cookies a flavor that is a little ‘deeper’ than most. The cookies were soft right out of the oven. These were easy to make and will not last long around the house (a sign that this recipe is a keeper)

Also, heed the instructions to remove the cookies from the oven as soon as the outsides are set but the centers are still puffy and soft. Doing so plays a large part in the resulting texture. Cooling the cookies on the baking sheets means they will continue to bake after being taken out of the oven, but without the circulating air of a cooling rack, they will retain their soft texture.


http://bakingblonde.files.wordpress.com/2008/09/sept-021.jpg
Photo courtesy of Bakingblonde


Brown Sugar Chocolate Chip Cookies

1 cup (2 sticks) butter, softened
1 1/2 cups brown sugar
2 eggs
2 tsp vanilla
3 cups flour
3/4 tsp Kosher salt
1 tsp baking soda
1 cup semisweet or milk chocolate chips (I used a mixture of chocolate and peanut butter chips)

1. Preheat oven to 350°F.

2. Mix flour, salt, and baking soda together in medium bowl; set aside.

3. Beat the butter and brown sugar until thoroughly blended. Add eggs, and vanilla and mix to combine. Add dry ingredients and mix just to blend. Gently fold in chips.

4. Place dough onto parchment paper-lined cookie sheet using a scooper. Bake 9-12 minutes (depending on the size of your cookies and your oven) or until cookies are pale golden brown and the outer edges start to harden yet the centers are still soft and puffy.

5. Cool cookies on cookie sheets for 5 minutes. Transfer to cooling rack until cooled completely.

Tuesday, March 30, 2010

Reese's Peanut Butter Egg Cookies

Posted by Laura at 2:11 PM 0 comments
I adore Reese's Peanut Butter Cups, and Reese's Eggs are even better because, well, there's even more peanut-buttery goodness packed inside every egg! These cookies were absolutely to die for. My eggs were at room temperature, so they broke up quite a bit when they got mixed in to the cookie dough, so I would recommend popping them in the fridge if you want them to retain their shape in the cookies. Personally, I don't think you can go wrong either way, but to each his own.

I snapped some pictures of the prep (I'll post them later) but totally forgot to take pictures of the final product! Check out Picky Palate for more mouthwatering photos, like the one below, of these awesome cookies! (Looking at her photos makes me realize I need some fun plates and bowls to add some much needed variety to the pictures of my plated my desserts.)

Photo courtesy of Jenny @ Picky Palate

Reese's Peanut Butter Egg Cookies
(Source: Picky Palate)

2 sticks softened butter
1 Cup packed brown sugar
1 Cup granulated sugar
3 Tablespoons corn syrup
2 large eggs plus 1 egg white
1 Tablespoon pure vanilla extract
3 1/2 Cups all purpose flour
1 1/4 teaspoon baking soda
1/2 teaspoon salt
3 Cups chopped Reese's Peanut Butter Eggs, 12 total eggs


1. Preheat oven to 350°F. In a stand or electric mixer beat the butter, sugars and corn syrup until well combined….light and fluffy. Beat in eggs and vanilla until well combined.

2. In a large bowl, mix the flour, baking soda and salt. Slowly add to wet ingredients along with the chopped Reese's Peanut Butter Eggs. Mix only until just combined. Using a medium cookie scoop, scoop dough onto a silpat or parchment lined baking sheet. Bake for 9-11 minutes until just turning golden around edges. Let cookies cool for 5 minutes before transferring to a cooling rack. Eat with tall glass of milk!!

Make approximately 4 dozen (delicious!) cookies.

Wednesday, March 17, 2010

Shamrock Cookies

Posted by Laura at 9:34 AM 1 comments
Happy St. Patrick's Day!


Another holiday, another opportunity to make themed sugar cookies!

If you haven't noticed, sugar cookies have become my newest obsession. Since discovering how easy it is to use royal icing, I have been making sugar cookies every opportunity I get. Yes they are very time consuming, but the finished cookies are so dang cute! Don't you agree?


I also enjoy trying a new sugar cookie recipe each time. This recipe, from Dorie Greenspan, was wonderfully delicious. The dough itself was very soft, which made it a little more difficult to work with, so I wouldn't recommend this recipe to anyone who is trying out cutout sugar cookies for the first time. The recipe yields 50 2-inch cookies. I doubled it, since i was making 3 inch cookies an wanted to make sure I had enough to share with family and coworkers.

Once again, I did not get the color I was looking for in my royal icing. My colors always seem to turn out lighter than I'd like. For those of you who are pros with icing colors, am I just not using enough of the stuff? I guess I just need to whip up a batch of icing and play around with all of the colors that I have.


All-Occasion Sugar Cookies
(Source: Baking: From My Home to Yours by Dorie Greenspan, pages 146-147)

2 cups all-purpose flour
1/2 teaspoon salt
1/2 teaspoon baking powder
1 stick plus 2 tablespoons (10 tablespoons) unsalted butter, at room temperature
1 cup sugar
1 large egg
1 large egg yolk
1 teaspoon pure vanilla extract


1. Whisk the flour, salt and baking powder together.

2. Using a stand mixer fitted with the paddle attachment, beat the butter at medium speed for a minute or so, until smooth. Beat in the sugar and continue to beat for about 2 minutes, until the mixture is light and pale. Add the egg and yolk and beat for another minute or two; beat in the vanilla.

3. Reduce the mixer speed to low and steadily add the flour mixture, mixing only until it has been incorporated.

4. Turn the dough out onto a counter and divide it in half. Shape each half into a disk and wrap in plastic. Chill for at least 2 hours. (Well wrapped, the dough can be refrigerated for up to 3 days or frozen for up to 2 months.)

5. Center a rack in the oven and preheat the oven to 350F. Line two baking sheets with parchment paper or silicone mats.

6. Working with one packet of dough at a time, roll out the dough between sheets of plastic wrap or wax paper to a thickness of 1/4 inch, lifting the plastic or paper and turning the dough over often so that it rolls evenly. Lift off the top sheet of plastic or paper and cut out the cookies – I like a 2-inch round cookie cutter for these. Pull away the excess dough, saving the scraps for re-rolling, and carefully lift the rounds onto the baking sheets with a spatula, leaving about 1 1/2 inches between the cookies.

7. Bake the cookies one sheet at a time for 9 to 11 minutes, rotating the sheet at the midpoint. The cookies should feel firm, but they should not color much, if at all. Remove the pan from the oven and dust the cookies with sugar or cinnamon sugar, if you’d like. Let them rest for 1 minute before carefully lifting them onto a rack to cool to room temperature.

Monday, March 1, 2010

Peanut Butter-Oatmeal Chocolate Chip Cookies

Posted by Laura at 6:40 AM 1 comments
Happy National Peanut Butter Lover’s Day!

Soft and tender from the peanut butter, a slight toasted flavor from the oats and just the right amount of sweetness from the chocolate chips. Definitely not your typical oatmeal cookie, as only 1/2 cup of oats is used in the dough, but they are still amazing!


Peanut Butter-Oatmeal Chocolate Chip Cookies
(Source: Brown Eyed Baker)

1 cup all-purpose flour
1 teaspoon baking soda
1/4 teaspoon salt
1 stick (1/2 cup) unsalted butter, at room temperature
1/2 cup creamy peanut butter
1/2 cup granulated sugar
1/3 cup light brown sugar
1/2 teaspoon vanilla extract
1 egg
1/2 cup rolled oats
1 cup semisweet chocolate chips


1. Preheat oven to 350F. Line two baking sheets with parchment paper and set aside.

2. Whisk together the flour, baking soda and salt; set aside.

3. On medium speed, cream together the butter, peanut butter, granulated sugar, brown sugar and vanilla extract, about 3 minutes. Add the egg and beat to combine. On low speed, gradually add the flour until just combined. Stir in the oats, and then the chocolate chips.

4. Use a large cookie scoop (3 tablespoons) and drop dough onto prepared baking sheets about 2 inches apart. Bake for 10 minutes, or until the cookies are lightly golden. Cool completely on the baking sheet and then store in an airtight container at room temperature.


Makes about 16 cookies

Sunday, February 14, 2010

Sugar Cookies a la Martha Stewart

Posted by Laura at 4:10 PM 2 comments
I made these cookies over the course of a few days last week, but I wanted to wait until today, Valentine's Day, to share them with you. Because my cookie cutouts were smaller than 4-5 inches, I adjusted my baking time to about 14 minutes and they came out perfectly. Once again, I used Royal icing (recipe here) and it was much easier than last time! I think I'm starting to get the hang of it, except for the whole "writing on the cookies" part of it. My handwriting is normally less than stellar and it was just as bad, if not worse, using a decorating bag and tip. Perhaps practice will make perfect...

After using Royal Icing for my Christmas cookies, I knew I wanted to try using gel icing colors instead of food coloring this time around. Gel icing colors are easy to use and give great color, but I was a little disappointed in my red color - I wanted it to be bright red and in complete contrast to my pink color. After doing a little research, it turns out the red color I have, Red (no-taste), is more of a pink-red and I would have gotten the results I wanted with Red-Red or Christmas Red. Better luck next time, I guess.

Happy Valentine's Day!


Martha Stewart's Sugar Cookies
(Source: Smells Like Home)

4 cups sifted all-purpose flour
1 tsp baking powder
1/2 tsp salt
1 cup (2 sticks) unsalted butter, room temperature
2 cups granulated sugar
2 large eggs
2 tsp pure vanilla extract


1. Sift flour, baking powder, salt into a bowl.

2. Put butter and sugar in the bowl of an electric mixer fitted with the paddle attachment. Mix on medium speed until pale and fluffy. Mix in eggs and vanilla. Reduce speed to low. Gradually mix in flour mixture. Divide dough into quarters; flatten each quarter into a disk. Wrap each in plastic. Refrigerate until firm, at least 1 hour or overnight.

3. Preheat oven to 325 degrees with racks in upper and lower thirds. Let one disk of dough stand at room temperature just until soft enough to roll, about 10 minutes. Roll out dough between two pieces of plastic wrap to 1/4-inch thickness. Remove top layer of plastic wrap. Cut out cookies with a 4-to-5-inch cookie cutter. Transfer cutouts to a parchment-lined baking sheet. Transfer baking sheet to freezer, and freeze until very firm, about 15 minutes. Roll out scraps, and repeat. Repeat with remaining disk of dough. Remove baking sheet from freezer right before baking

4. Bake, switching positions of sheets and rotating halfway through, until edges are almost golden, 15 to 18 minutes. Let cool on sheets on wire racks.


Sunday, December 20, 2009

On the Twelfth Day of Cookies...

Posted by Laura at 11:17 AM 2 comments
I am so proud of these bad boys. This was my first time working with royal icing, and it went really well! I found Brown Eyed Baker's guide to decorating cookies extremely helpful through the whole process. Using royal icing, though time consuming, is quite easy and totally worth the extra effort. My only complaint was that my hand started cramping up after using the piping bags for awhile, but it was well worth it to get such professional looking cookies. I think it's safe to say my cookies will never look like this again! And, if you were wondering, the cookies themselves taste amazing! The little bit of cinnamon in the dough is just brilliant and really gives them an added boost of flavor.


Cinnamon Sugar Cookies

(Source: Smells Like Home)

4 cups sifted all-purpose flour
1 teaspoon baking powder
1/2 teaspoon salt
3/4 teaspoon ground cinnamon
1 cup (2 sticks) unsalted butter, room temperature
2 cups granulated sugar
2 large eggs
2 teaspoons pure vanilla extract

1. Sift flour, baking powder, salt, and cinnamon into a bowl.

2. Put butter and sugar in the bowl of an electric mixer fitted with the paddle attachment. Mix on medium speed until pale and fluffy. Mix in eggs and vanilla. Reduce speed to low. Gradually mix in flour mixture. Divide dough into quarters; flatten each quarter into a disk. Wrap each in plastic. Refrigerate until firm, at least 1 hour or overnight.

3. Preheat oven to 325°F with racks in upper and lower thirds. Let one disk of dough stand at room temperature just until soft enough to roll, about 10 minutes. Roll out dough between two pieces of plastic wrap to 1/4-inch thickness. Remove top layer of plastic wrap. Cut out cookies with a 4-to-5-inch cookie cutter. Transfer cookie dough on plastic wrap to a baking sheet. Transfer baking sheet to freezer, and freeze until very firm, about 15 minutes. Remove baking sheet from freezer, and transfer shapes to baking sheets lined with nonstick baking mats. Roll out scraps, and repeat. Repeat with remaining disk of dough.

4. Bake, switching positions of sheets and rotating halfway through, until edges are almost golden, 14 minutes. Let cool on sheets on wire racks.


Royal Icing
(Source: Smells Like Home)

4 cups powdered sugar, sifted
2 tbsp meringue powder
4 1/2 tbsp water
1/2 tbsp pure vanilla extract


1. Combine all ingredients in the bowl of a stand mixer fitted with the paddle attachment. Mix on low speed until the sheen has disappeared and the icing has a matte appearance (about 7-10 minutes). Transfer the contents of the mixing bowl to an air-tight container. This will be the stiffest consistency of the icing, and at this point it is still too stiff to use for decorating. Add water a very small amount at a time and stir by hand until fully incorporated. Continue until the icing has reached a consistency appropriate for piping. (Remember, if you are having any difficulty piping, it is still too thick. Add a little more liquid and try again.) Using a pastry bag, pipe around the edges of each cookie. Let stand so the icing will set. Make sure to keep the leftover icing covered at all times when not in use so that it does not begin to harden.

2. Once all the cookies have been edged, transfer some of the remaining icing to a separate air-tight container. Thin out by incorporating a small amount of water at a time, until the icing drips off the spoon easily when lifted and then smooths in with that still in the bowl. If you go too far and the icing is too thin, add more sifted powdered sugar to thicken it again. Once the icing has reached the desired consistency, transfer it to a squeeze bottle (or a plastic bag with a hole in one corner), and flood the area surrounded by the piping on each cookie. If it does not completely spread to the edges, use a toothpick to help it along. Allow to set.


Thursday, December 17, 2009

On the Ninth Day of Cookies...

Posted by Laura at 8:17 PM 0 comments
My husband loved these cookies (he ate like five of them fresh out of the oven), but I was a little disappointed in how they turned out. They were very crispy around the edges and very, very flat (thin). But I guess appearances aren't everything because they do taste very good and the mint flavor of the Mint Chocolate M&Ms is quite noticeable.


Minty M&M Cookies
(Adapted from Joy of Baking)

2 cups all purpose flour
1 1/4 tsp baking soda
1/4 tsp salt
3/4 cup unsalted butter, room temperature
2/3 cup granulated white sugar
2/3 cup firmly packed light brown sugar
1 large egg
1 large egg yolk
1 1/2 tsp pure vanilla extract
1 cup Mint Chocolate M&M's


1. Preheat oven to 350°F.

2. In a large bowl, whisk together the flour, baking soda, and salt.

3. In the bowl of your electric mixer (or with a hand mixer), cream the butter and sugars until light and fluffy (about 2 - 3 minutes). Scrape down the sides of the bowl. Add the egg and egg yolk, beating until well combined. Beat in the vanilla extract.

4. Gradually add the flour mixture to the creamed mixture and beat just until incorporated. Scrape down the sides of the bowl as needed.

5. Form dough into balls. Gently flatten each ball of dough. Completely cover the tops of the cookies with the M&M's. Gently press the candies into the dough. Bake the cookies for 7-10 minutes, rotating the baking sheets halfway through the baking time. The cookies are done when they are light golden brown in color and just set. They will still seem a little soft but they will firm up as they cool. Remove from oven and let the cookies cool a few minutes on the baking sheet before transferring them to a wire rack to cool.

Tuesday, December 15, 2009

On the Seventh Day of Cookies...

Posted by Laura at 9:16 PM 0 comments
These cookie tartlets are quick and easy and very tasty. The crushed candy canes give it an extra crunch and a boost of flavor reminiscent of Christmas.


Peppermint Bark Cookie Tartlets
(Source: Nestle Toll House)

1 package Refrigerated Sugar Cookie Dough, slightly softened
1/3 cup plus 1 tablespoon all-purpose flour
1/2 cup White Chocolate Chips
1/2 cup finely crushed candy canes

1. Preheat oven to 325°F.

2. Combine cookie dough and flour in large mixing bowl. Divide dough into 24, 1 1/4-inch balls. Press dough into mini-muffin cups.

3. Bake for 10 minutes or until light golden brown around edges and puffy.

4. Remove tartlets from oven and immediately fill with morsels and crushed candy canes. Cool for 10 minutes in muffin cups. Carefully remove to wire rack, do not invert; cool completely.

Saturday, December 12, 2009

On the Fifth Day of Cookies...

Posted by Laura at 1:16 PM 0 comments
Another classic cookie recipe that just cannot be left out. Trees, poinsettias, wreaths, and ribbon have been a part of my holiday season for as long as I can remember. Be sure to watch these cookies very carefully while baking as they can go from perfect to burnt in a matter of seconds. The cookies should be removed from the oven as soon as the edges begin to turn a little brown.


Spritz Cookies

(Source: An old family recipe)

1 cup butter
1 cup sugar
1 1/2 tsp vanilla
2 eggs
3 cups flour
1/2 tsp salt

1. Cream butter, sugar, and vanilla.

2. Add eggs and beat well.

3. Sift flour and salt together; add in three additions, mixing well after each addition.

4. Place dough in cookie press. Form desired shapes on ungreased cookie sheet.

5. Bake at 400°F for 7-8 minutes or until just starting to turn golden brown around the edges, being careful not to over bake.

Tuesday, December 8, 2009

On the Second Day of Cookies...

Posted by Laura at 8:38 PM 0 comments
If you are unfamiliar with these cookies, they are of German origin, very spicy, with molasses and black pepper in them. The translation of Pfeffernussen is “pepper nuts”, although my recipe doesn’t call for nuts I understand that some do. The snowy sugar surface of Pfeffernussen contrasts nicely with the spicy, sweet, soft, crisp crust of the cookie. A perfect addition to your holiday spread.


Pfeffernussen
(Source: Martha Stewart)

1 1/4 cups confectioners' sugar
2 1/4 cups all-purpose flour
1/4 teaspoon freshly ground pepper
3/4 teaspoon ground cinnamon
1/2 teaspoon ground allspice
1/4 teaspoon freshly ground nutmeg
1/4 teaspoon ground cloves
1/4 teaspoon baking soda
1/2 cup (1 stick) unsalted butter, room temperature
3/4 cup firmly packed light-brown sugar
1 large egg
1/4 cup unsulfured molasses
1/2 teaspoon pure vanilla extract


1. Preheat oven to 350 degrees. Line two baking sheets with parchment paper. Place the confectioners' sugar in a brown paper bag.

2. In a medium bowl, combine flour, pepper, cinnamon, allspice, nutmeg, cloves, and baking soda. Set aside.

3. Place butter, brown sugar, and molasses in the bowl of an electric mixer fitted with paddle attachment. Beat on medium speed until fluffy, about 3 minutes. Beat in egg and vanilla. With mixer on low speed, add flour mixture; beat until just combined. Pinch off dough in tablespoon amounts; roll into 1 1/4-inch balls. Arrange balls 1 1/2 inches apart on prepared baking sheets. (Dough can be frozen at this point, covered tightly with plastic wrap, up to 1 month.)

4. Bake until cookies are golden and firm to the touch with slight cracking, about 15 minutes, rotating sheets halfway through. Transfer sheets to a wire rack to cool slightly, about 10 minutes. Working in batches, place cookies in paper bag; shake until well coated. Let cool completely on wire rack. Store in an airtight container.

Sunday, November 22, 2009

Pumpkin Spice Cookies

Posted by Laura at 8:15 AM 1 comments
A lot of pumpkin cookies, while very good, are very cakey. These pumpkin cookies, however, are moist and have the perfect texture. Because of the molasses, the pumpkin flavor isn't as pronounced as I would like it to be, but they are still delicious and very, very addicting.


Pumpkin Spice Cookies
(Source: Beantown Baker)

1/2 cup unsalted butter, softened
1 cup sugar, plus 1/4 cup for rolling
1/3 canned pumpkin puree
1/4 cup molasses
1 egg
2 1/3 cups all purpose flour
2 tsp baking soda
1 tsp ground cinnamon
1 tsp ground ginger
1/2 tsp ground cloves
1/2 tsp salt

1. Beat the butter in a large bowl. Add 1 cup sugar, pumpkin, molasses, and egg and continue beating until well combined and fluffy.

2. Sift together remaining ingredients and gradually add to wet ingredients, beating on low speed until thoroughly incorporate. Refrigerate for up to one hour or until batter can be handled.

3. Preheat oven to 350F. Place remaining 1/4 cup sugar in a pie dish. Form the batter into walnut-sized balls. Roll in sugar and arrange on cookie sheets, 2 inches apart. Bake for 10 minutes, rotating pans halfway through.

4. Cool for a few minutes on sheets and then remove to wire racks to continue cooling.


Sunday, November 8, 2009

The Mother Load Layered Cookie Bars

Posted by Laura at 12:56 PM 1 comments
I must admit I was slightly disappointed in the bars at first. I had some girlfriends over last night, so I whipped these bars up in the afternoon. When I cut into them before they arrived, the bars were a mushy mess! They tasted wonderful, but the layers all sort of mushed together into a cookie mess. (Thankfully we also had Chocolate chip cookies and chocolate chocolate chip cookies due to the recipe making extra dough.)

HOWEVER
, when I took a look at the remaining bars today (I only plated a handful of bars for my friends since they were so messy), they were perfect. PERFECT! I guess I cut them too soon and they just needed more time to set. These cookie bars really were incredible and very rich. I would recommend cutting them into smaller bars than Jenny originally suggests.


The Mother Load Layered Cookie Bars
(Source: Picky Palate)


Layer 1: Sugar Cookie

1 Roll of Pillsbury Sugar Cookie Dough

1. Press sugar cookie dough into bottom of a 9×13 inch baking dish that’s been lined foil and sprayed with cooking spray.

Layer 2: Double Chocolate Chip Cookie
(the recipe below makes double what you’ll need for the bars, use extra for cookies)

1 cup butter
1 cup white sugar
3/4 cup brown sugar
2 eggs
1 tsp vanilla
1 3/4 cups flour
1 1/4 cup cocoa powder (I only used 1 cup)
2 tsp baking soda
1/4 tsp salt
1 1/2 cups chocolate chips

1. In a large bowl, cream together the butter and sugars until light and fluffy. Slowly add eggs and vanilla until well combined.

2. In another bowl, combine the flour, cocoa, baking soda and salt. Slowly add to wet ingredients then stir in chips. Layer 1/2 the recipe over sugar cookie layer, pressing gently.


Layer 3: Peanut Butter Cookie

1 cup creamy peanut butter
1/2 cup granulated sugar
1 egg

1. Place all ingredients into a bowl and mix until combined. Press over chocolate cookie dough.


Layer 4: Chocolate Chip Cookie
(the recipe below makes double what you’ll need for the bars, use extra for cookies)

2 sticks softened butter
3/4 cup granulated sugar
3/4 cup brown sugar
2 eggs
1 Tbsp pure vanilla
2 1/2 cups all purpose flour
1 tsp baking soda
1/2 tsp salt
1 bag chocolate chips

1. Preheat oven to 350°F.

2. In a stand or electric mixer cream the butter and sugars until well combined. Beat in eggs and vanilla until combined.

3. Place flour, baking soda and salt into a large bowl; mix to combine. Slowly add to wet ingredients along with chocolate chips.

4. Spoon 1/2 of the dough evenly over peanut butter cookie dough but don’t press, just leave uneven. Bake for 35-45 minutes or until center of dough is cooked mostly through. Edges will be brown. I covered pan with foil during the last 15 minutes of baking.

2. Let cookies cool completely. Lift out of pan with edges of foil. I cut off 1/2 inch edges and just used softer centers, but do as you wish. Edges are crispier. Drizzle top with 1/2 Cup melted chocolate chips if desired.

*Note: You can layer dough and refrigerate until ready to bake.

8 large bars (if you cut off edges), 12 bars (if you keep edges)


Sunday, September 27, 2009

Thick and Chewy Chocolate Chip Cookies

Posted by Laura at 7:12 PM 0 comments
These are the best chocolate chip cookies I've had in awhile. As the name suggests, they are both thick and chewy like the kind of cookie you'd find at a bakery. After finding this winning recipe, I think it is safe to say I will never have to try another chocolate chip cookie recipe (though, honestly, I probably will, just for the sake of trying something new). If you’re looking for a classic, this is it.

Thick & Chewy Chocolate Chip Cookies by you.


Thick & Chewy Chocolate Chip Cookies
(Source: Annie's Eats)

2 cups plus 2 tbsp. all-purpose flour
1/2 tsp. baking soda
1/2 tsp. salt
12 tbsp. unsalted butter, melted and cooled until warm
1 cup brown sugar, packed
1/2 cup granulated sugar
1 large egg plus 1 egg yolk
2 tsp. vanilla extract
1-2 cups semi-sweet chocolate chips


1. Preheat oven 325°F.

2. In a bowl, mix dry ingredient. In mixing bowl, combine butter and sugars until well blended. Add egg, yolk, and vanilla. Batter will appear slightly greasy.

3. Add dry ingredients, until blended. Stir in chocolate chips.

4. Scoop balls onto cookie sheet and bake for 12-15 min.

Whole Wheat Cinnamon Cookies

Posted by Laura at 4:12 PM 0 comments
These cookies are just like snickerdoodles, but quicker and healthier (if you can even consider a cookie healthy). This recipe uses whole wheat flour and incorporates cinnamon into the batter instead of rolling the dough into balls and then in cinnamon and sugar. A delicious twist on a great cookie.


Whole Wheat Cinnamon Cookies by you.


Whole Wheat Cinnamon Cookies
(Source: Lynn's Kitchen Adventures)

1/2 cup butter, softened
1/2 cup shortening
1 1/2 cups sugar
2 eggs
2 tsp vanilla extract
1 1/4 cups whole wheat flour
1 1/2 cups all purpose flour
2 tsp cream of tartar
1 tsp baking soda
1/4 tsp salt
2 tsp ground cinnamon

1. Preheat oven to 400°F.

2. Cream together butter, shortening, sugar, the eggs and the vanilla.

3. Blend in the flour, cream of tartar, soda, salt, and cinnamon.

4. Scoop spoonfuls onto greased cookie sheet 2 inches apart.

5. Bake 8 to 10 minutes, or until set but not overcooked.

Saturday, September 5, 2009

Sugar Cookie Bars

Posted by Laura at 3:43 PM 0 comments
I love making sugar cookies, but it takes a lot of time an energy to decorate those oh-so-cute shapes and sometimes you just want something simple. These bars have been making the rounds in the blogging world for a very good reason. These sugar cookie bars (as seen on 3 B's, One Ordinary Day, The Repressed Pastry Chef, and My Baking Addiction) are deliciously addicting and so simple you'll kick yourself for not trying them sooner.

There is one important thing to note before making these bars. They make an entire cookie sheet worth of bars. I guess the 5 cups of flour should have been a dead giveaway, but I didn't really pay attention to what I was doing until after the dough had been made. Thankfully my work buddies were more than happy to consume them. :)

So, word to the wise: half the recipe or make these when you have guests.

Sugar Cookie Bars by you.


Sugar Cookie Bars
(Source: One Ordinary Day)

1 cup butter, room temp.
2 cups sugar
4 eggs
2 tsp vanilla
5 cups flour
1 tsp salt
1/2 tsp soda

1. Cream butter and sugar until fluffy.

2. Add eggs, one at a time, mixing after each egg. Add vanilla & mix well.

3. In a separate bowl combine flour, salt & soda & stir with a whisk to combine. Add to wet mixture and mix just until combined.

4. Spread on a greased baking sheet (use a 13 x 18 pan). Bake at 375°F for 10-15 min, until light golden brown or until a toothpick comes out clean. Cool completely and frost.


Buttercream Icing
(Source: One Ordinary Day)

1/2 cup butter, room temp
1/2 cup shortening
1 tsp vanilla
pinch of salt
4 cups powdered sugar
5 Tbsp milk
food coloring (if desired)

1. Combine butter and shortening until smooth and creamy. Add vanilla and salt.

2. Add powdered sugar in 1-2 cup increments until combined, then add milk & mix until smooth and spreading consistency.

3. Spread over cooled cookie, then cut into bars.


Sugar Cookie Bars by you.

Makes a ridiculously obscene amount of (delicious) bars.

Irresistible Peanut Butter Cookies

Posted by Laura at 11:35 AM 1 comments
Out of nowhere, I got a serious craving for peanut butter cookies this week. I found this recipe over at Brown Eyed Baker and I knew it was the recipe for me. This recipe yielded cookies that reminded me of the peanut butter cookies my great grandma used to make. They were one type of cookie she ALWAYS made and they were so incredibly delicious. I can't remember the last time I had peanut butter cookies - probably not since my days of eating in Stav Hall at St. Olaf (3 years ago, people!). And those weren't even what I would consider a true peanut butter cookie because they lacked the crisscross pattern.

Irresistible Peanut Butter Cookies by you.


Irresistible Peanut Butter Cookies
(Source: Brown Eyed Baker)

1 3/4 all-purpose flour
3/4 tsp salt
3/4 tsp baking soda
3/4 cup creamy peanut butter
3/4 cup vegetable shortening
1 1/4 cups packed light brown sugar
3 Tbsp milk
1 Tbsp vanilla
1 egg
Granulated sugar, for rolling cookies

1. Preheat oven to 375°F. Line baking sheets with parchment or a silicone baking mat.

2. Combine the flour, salt and baking soda in a small bowl and set aside.

3. Combine the peanut butter, shortening, brown sugar, milk and vanilla in a mixing bowl. Beat at medium speed until well blended. Add the egg and beat just until blended. Reduce speed to low and add to the creamed mixture gradually, mixing just until combined.

4. Put the granulated sugar in a small bowl. Scoop a tablespoonful of dough and roll into a ball between the palms of your hands. Roll the dough into the sugar and place on the baking sheet, about 2 inches apart. Dip the tines of a fork into the sugar and make a crisscross patern on the cookies, flattening them slightly.

5. Bake for 7 to 8 minutes or until set and just beginning to brown. Cool 2 minutes on baking sheet before removing to a cooling rack.

Storing: Store these cookies in an airtight container for about a week. You can also freeze these cookies in a freezer bag for approximately 3 months and thaw when you are ready to eat them.

Irresistible Peanut Butter Cookies by you.


Laura's Sweet Treats Copyright 2009 Sweet Cupcake Designed by Ipiet Templates Image by Tadpole's Notez