Tuesday, April 20, 2010

Happy Birthday to Me!

Posted by Laura at 8:40 PM 1 comments
Get out your hats & noisemakers people, it's my birthday!


I really only bring this up because I am excited to now be the proud owner of this KitchenAid Food Processor:

http://cn1.kaboodle.com/hi/img/c/0/0/d/7/AAAADDd7m6QAAAAAAA1yog.jpg
(I got it in white, of course, to match my KitchenAid Stand Mixer.)

Ever since I saw the episode of Good Eats where Alton Brown makes peanut butter, I have been dying to get one. I set about researching food processors immediately, and I found this article at Consumer Search to be very helpful. I knew I wasn't in the market for a large capacity food processor, so I skipped straight to the compact models. Choosing the KitchenAid one was a no-brainer for me since, well, I already own and adore their Stand Mixer.

I am super excited to try it out and I think one of the first orders of business will be to make the peanut butter that inspired the purchase and that I've been drooling over for the last 2 1/2 months!

Sunday, April 18, 2010

Chewy Granola Bars

Posted by Laura at 12:09 PM 1 comments
Hi, it's me.

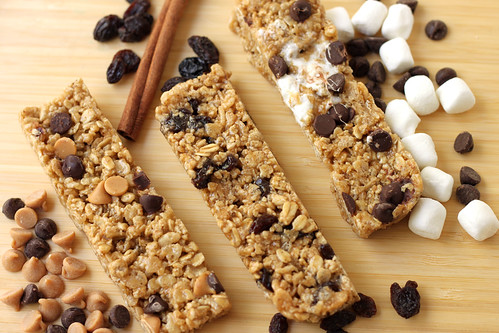
With our overabundance of Girl Scout Cookies and Easter candy, I haven't been in my kitchen much lately. We're still recovering from our sugar high so, while I was eager to get back in the kitchen, I wasn't ready for another sweet treat. The solution?

Chewy Granola Bars.


Chewy Granola Bars

These granola bars are boasted to taste exactly like the Quaker Chewy Granola Bars, and I'll admit they were pretty close. The outside of mine turned out sticky-crunchy (I think that maybe had something to do with the honey?) with a chewy center. They were good, but not as chewy as I would have hoped. At any rate, I will definitely be trying these out again.

Note about Granola: The original recipe recommends this granola, which I had a really hard time finding. I’ve never bought granola before, but I eventually found it in the Organic Foods section at Rainbow.


Peanut Butter Chocolate Chip Chewy Granola Bars
(Source: Adapted from Rachel Ray)

4 Tbsp (1/2 stick) unsalted butter
1/2 cup packed light brown sugar
1/4 cup honey
2 cups plain granola
1 cup rice cereal
1/4 cup semisweet chocolate chips
1/4 cup peanut butter chips


1. Combine honey and butter in a medium saucepan over medium-high heat. Stir in brown sugar after butter starts to melt.

2. Bring the mixture to a boil, then lower the heat to medium-low and simmer until the sugar dissolves, about 2 minutes. Remove the saucepan from the heat.

3. Add the granola and rice cereal into the saucepan and fold them into the sauce until evenly coated.

4. Spread the mixture into a 9×13 inch ungreased baking pan and press firmly with a spatula to evenly fill. Sprinkle the chocolate and peanut butter chips onto the top of the granola and gently press them down.

5. Put the pan in the refrigerator until cooled and firm, about 15 minutes, then cut into bars.

18 servings

Tuesday, March 30, 2010

Reese's Peanut Butter Egg Cookies

Posted by Laura at 2:11 PM 0 comments
I adore Reese's Peanut Butter Cups, and Reese's Eggs are even better because, well, there's even more peanut-buttery goodness packed inside every egg! These cookies were absolutely to die for. My eggs were at room temperature, so they broke up quite a bit when they got mixed in to the cookie dough, so I would recommend popping them in the fridge if you want them to retain their shape in the cookies. Personally, I don't think you can go wrong either way, but to each his own.

I snapped some pictures of the prep (I'll post them later) but totally forgot to take pictures of the final product! Check out Picky Palate for more mouthwatering photos, like the one below, of these awesome cookies! (Looking at her photos makes me realize I need some fun plates and bowls to add some much needed variety to the pictures of my plated my desserts.)

Photo courtesy of Jenny @ Picky Palate

Reese's Peanut Butter Egg Cookies
(Source: Picky Palate)

2 sticks softened butter
1 Cup packed brown sugar
1 Cup granulated sugar
3 Tablespoons corn syrup
2 large eggs plus 1 egg white
1 Tablespoon pure vanilla extract
3 1/2 Cups all purpose flour
1 1/4 teaspoon baking soda
1/2 teaspoon salt
3 Cups chopped Reese's Peanut Butter Eggs, 12 total eggs


1. Preheat oven to 350°F. In a stand or electric mixer beat the butter, sugars and corn syrup until well combined….light and fluffy. Beat in eggs and vanilla until well combined.

2. In a large bowl, mix the flour, baking soda and salt. Slowly add to wet ingredients along with the chopped Reese's Peanut Butter Eggs. Mix only until just combined. Using a medium cookie scoop, scoop dough onto a silpat or parchment lined baking sheet. Bake for 9-11 minutes until just turning golden around edges. Let cookies cool for 5 minutes before transferring to a cooling rack. Eat with tall glass of milk!!

Make approximately 4 dozen (delicious!) cookies.

Wednesday, March 17, 2010

Shamrock Cookies

Posted by Laura at 9:34 AM 1 comments
Happy St. Patrick's Day!


Another holiday, another opportunity to make themed sugar cookies!

If you haven't noticed, sugar cookies have become my newest obsession. Since discovering how easy it is to use royal icing, I have been making sugar cookies every opportunity I get. Yes they are very time consuming, but the finished cookies are so dang cute! Don't you agree?


I also enjoy trying a new sugar cookie recipe each time. This recipe, from Dorie Greenspan, was wonderfully delicious. The dough itself was very soft, which made it a little more difficult to work with, so I wouldn't recommend this recipe to anyone who is trying out cutout sugar cookies for the first time. The recipe yields 50 2-inch cookies. I doubled it, since i was making 3 inch cookies an wanted to make sure I had enough to share with family and coworkers.

Once again, I did not get the color I was looking for in my royal icing. My colors always seem to turn out lighter than I'd like. For those of you who are pros with icing colors, am I just not using enough of the stuff? I guess I just need to whip up a batch of icing and play around with all of the colors that I have.


All-Occasion Sugar Cookies
(Source: Baking: From My Home to Yours by Dorie Greenspan, pages 146-147)

2 cups all-purpose flour
1/2 teaspoon salt
1/2 teaspoon baking powder
1 stick plus 2 tablespoons (10 tablespoons) unsalted butter, at room temperature
1 cup sugar
1 large egg
1 large egg yolk
1 teaspoon pure vanilla extract


1. Whisk the flour, salt and baking powder together.

2. Using a stand mixer fitted with the paddle attachment, beat the butter at medium speed for a minute or so, until smooth. Beat in the sugar and continue to beat for about 2 minutes, until the mixture is light and pale. Add the egg and yolk and beat for another minute or two; beat in the vanilla.

3. Reduce the mixer speed to low and steadily add the flour mixture, mixing only until it has been incorporated.

4. Turn the dough out onto a counter and divide it in half. Shape each half into a disk and wrap in plastic. Chill for at least 2 hours. (Well wrapped, the dough can be refrigerated for up to 3 days or frozen for up to 2 months.)

5. Center a rack in the oven and preheat the oven to 350F. Line two baking sheets with parchment paper or silicone mats.

6. Working with one packet of dough at a time, roll out the dough between sheets of plastic wrap or wax paper to a thickness of 1/4 inch, lifting the plastic or paper and turning the dough over often so that it rolls evenly. Lift off the top sheet of plastic or paper and cut out the cookies – I like a 2-inch round cookie cutter for these. Pull away the excess dough, saving the scraps for re-rolling, and carefully lift the rounds onto the baking sheets with a spatula, leaving about 1 1/2 inches between the cookies.

7. Bake the cookies one sheet at a time for 9 to 11 minutes, rotating the sheet at the midpoint. The cookies should feel firm, but they should not color much, if at all. Remove the pan from the oven and dust the cookies with sugar or cinnamon sugar, if you’d like. Let them rest for 1 minute before carefully lifting them onto a rack to cool to room temperature.

Monday, March 1, 2010

Peanut Butter-Oatmeal Chocolate Chip Cookies

Posted by Laura at 6:40 AM 1 comments
Happy National Peanut Butter Lover’s Day!

Soft and tender from the peanut butter, a slight toasted flavor from the oats and just the right amount of sweetness from the chocolate chips. Definitely not your typical oatmeal cookie, as only 1/2 cup of oats is used in the dough, but they are still amazing!


Peanut Butter-Oatmeal Chocolate Chip Cookies
(Source: Brown Eyed Baker)

1 cup all-purpose flour
1 teaspoon baking soda
1/4 teaspoon salt
1 stick (1/2 cup) unsalted butter, at room temperature
1/2 cup creamy peanut butter
1/2 cup granulated sugar
1/3 cup light brown sugar
1/2 teaspoon vanilla extract
1 egg
1/2 cup rolled oats
1 cup semisweet chocolate chips


1. Preheat oven to 350F. Line two baking sheets with parchment paper and set aside.

2. Whisk together the flour, baking soda and salt; set aside.

3. On medium speed, cream together the butter, peanut butter, granulated sugar, brown sugar and vanilla extract, about 3 minutes. Add the egg and beat to combine. On low speed, gradually add the flour until just combined. Stir in the oats, and then the chocolate chips.

4. Use a large cookie scoop (3 tablespoons) and drop dough onto prepared baking sheets about 2 inches apart. Bake for 10 minutes, or until the cookies are lightly golden. Cool completely on the baking sheet and then store in an airtight container at room temperature.


Makes about 16 cookies

Sunday, February 14, 2010

Sugar Cookies a la Martha Stewart

Posted by Laura at 4:10 PM 2 comments
I made these cookies over the course of a few days last week, but I wanted to wait until today, Valentine's Day, to share them with you. Because my cookie cutouts were smaller than 4-5 inches, I adjusted my baking time to about 14 minutes and they came out perfectly. Once again, I used Royal icing (recipe here) and it was much easier than last time! I think I'm starting to get the hang of it, except for the whole "writing on the cookies" part of it. My handwriting is normally less than stellar and it was just as bad, if not worse, using a decorating bag and tip. Perhaps practice will make perfect...

After using Royal Icing for my Christmas cookies, I knew I wanted to try using gel icing colors instead of food coloring this time around. Gel icing colors are easy to use and give great color, but I was a little disappointed in my red color - I wanted it to be bright red and in complete contrast to my pink color. After doing a little research, it turns out the red color I have, Red (no-taste), is more of a pink-red and I would have gotten the results I wanted with Red-Red or Christmas Red. Better luck next time, I guess.

Happy Valentine's Day!


Martha Stewart's Sugar Cookies
(Source: Smells Like Home)

4 cups sifted all-purpose flour
1 tsp baking powder
1/2 tsp salt
1 cup (2 sticks) unsalted butter, room temperature
2 cups granulated sugar
2 large eggs
2 tsp pure vanilla extract


1. Sift flour, baking powder, salt into a bowl.

2. Put butter and sugar in the bowl of an electric mixer fitted with the paddle attachment. Mix on medium speed until pale and fluffy. Mix in eggs and vanilla. Reduce speed to low. Gradually mix in flour mixture. Divide dough into quarters; flatten each quarter into a disk. Wrap each in plastic. Refrigerate until firm, at least 1 hour or overnight.

3. Preheat oven to 325 degrees with racks in upper and lower thirds. Let one disk of dough stand at room temperature just until soft enough to roll, about 10 minutes. Roll out dough between two pieces of plastic wrap to 1/4-inch thickness. Remove top layer of plastic wrap. Cut out cookies with a 4-to-5-inch cookie cutter. Transfer cutouts to a parchment-lined baking sheet. Transfer baking sheet to freezer, and freeze until very firm, about 15 minutes. Roll out scraps, and repeat. Repeat with remaining disk of dough. Remove baking sheet from freezer right before baking

4. Bake, switching positions of sheets and rotating halfway through, until edges are almost golden, 15 to 18 minutes. Let cool on sheets on wire racks.


Poppy Seed Pound Cake Muffins

Posted by Laura at 11:20 AM 2 comments
These have never been my favorite kind of muffin, but I was craving muffins and wanted to try something new. These poppy seed muffins are buttery yet light and when you combine that with crunchy poppy seeds and the citrus flavor of lemon, you have a muffin that will be sure to please anyone. I omitted the Lemon Glaze, though I am sure that would have made the muffins even tastier.


Poppy Seed Pound Cake Muffins
(Source: Joy of Baking)

2 cups all-purpose flour
2 Tbsp poppy seeds
1/2 tsp salt
1 1/4 tsp baking powder
1/4 tsp baking soda
1/2 cup unsalted butter
3/4 cup granulated white sugar
2 large eggs
Zest of one lemon
1 cup plain yogurt (do not use non fat yogurt)
1 teaspoon pure vanilla extract


1. Preheat oven to 350 F and place rack in center of oven. Line a 12 cup muffin pan with paper liners or spray with a non stick vegetable spray. Set aside.

2. In a small bowl, whisk or stir together the flour, poppy seeds, salt, baking powder and baking soda. Set aside.

3. In the bowl of your electric mixer, or with a hand mixer, cream the butter and sugar. Beat in eggs, one at a time, beating well after each addition. Beat in the lemon zest, yogurt, and vanilla until well blended. Stir in the flour mixture just until moistened. Do not over mix.

4. Spoon the batter using either two spoons or an ice cream scoop into the prepared muffin tins and bake for 18-20 minutes or until a wooden toothpick inserted in center comes out clean. Remove from oven and place on a wire rack to cool for 5 minutes before removing from pan.


Makes 12 muffins

Sunday, January 31, 2010

Peanut Butter Chocolate Chip Muffins

Posted by Laura at 6:11 PM 1 comments
I'm a big peanut butter-chocolate fiend, so I was really excited to try these muffins. Overall, I was a little disappointed in them. Their big, puffy domes were beautiful, but I just wasn't really impressed by the flavor. Yes, they're peanut buttery and yes, they've got yummy chocolate bits, so by all accounts I should have been wild about them. But I wasn't, and I think maybe it is the texture. Most muffins are light and fluffy. These were dense and I also think the bottoms got a little overdone. Andrew liked them, but I don't know that I'll make them again.


Peanut Butter Chocolate Chip Muffins
(Source: Annie's Eats)

2 1/4 cups all-purpose flour
2 tsp baking powder
1/2 tsp salt
2/3 cup brown sugar
6 Tbsp butter, melted and cooled
1/2 cup peanut butter
2 large eggs
1 cup milk
3/4 cup chocolate chips


1. Preheat oven to 375°. Line a muffin pan with 12 paper liners. (I greased my muffin cups instead)

2. In a medium bowl, whisk together the flour, baking powder, salt and brown sugar. Set aside.

3. In a large bowl, whisk together the melted butter, peanut butter, eggs and milk until smooth. Add in the flour mixture and stir until just combined. Stir in chocolate chips. Divide batter evenly between prepared muffin tins, filling each to the top.

4. Bake for 17-20 minutes or until a toothpick inserted in the center comes out clean. Allow to cool for 5 minutes in the pan, then remove to a wire rack to cool completely.

Sunday, January 17, 2010

Cherry Oatmeal Cookies

Posted by Laura at 10:35 AM 0 comments
I came across a bag of cherry morsels when I was cleaning out the kitchen cabinets and decided it was time to use them or lose them. When I hopped on the internet to look for recipes, there really weren't very many out there. I settled on this one, and I really wasn't sure how they'd turn out. Surprisingly, the cookies were actually quite good. The cinnamon and cherry flavors worked well together, and the oats added a nice texture to the cookie.


Cherry Oatmeal Cookies
(Source: Taste of Home)

1 cup butter, softened
1 cup packed brown sugar
1/2 cup sugar
2 eggs
1 teaspoon vanilla extract
3 cups old-fashioned oats
1-1/2 cups all-purpose flour
1 teaspoon baking soda
1 teaspoon ground cinnamon
1/2 teaspoon salt
1 package (10 ounces) cherry chips


1. In a large bowl, cream butter and sugars until light and fluffy. Beat in eggs and vanilla. Combine the oats, flour, baking soda, cinnamon and salt; gradually add to creamed mixture and mix well. Stir in chips and walnuts.

2. Drop by tablespoonfuls 3 in. apart onto ungreased baking sheets. Bake at 350° for 8-10 minutes or until lightly browned. Cool for 2 minutes before removing to wire racks.

Makes about 4 dozen.

Sunday, January 10, 2010

Puppy Chow

Posted by Laura at 3:27 PM 1 comments
I saw this recently on one of the many blogs I follow, and I knew I had to make some immediately. I probably haven't had Puppy Chow since high school, quite possibly since the time I upset my homeroom teacher Freshman year when I got powdered sugar all over the floor of his classroom. Sorry Mr. Erickson!

This recipe needs no tweaking. It is perfect just the way it is. It combines chocolate, peanut butter, and powdered sugar. What more could you ask for? And, as an added bonus, it's so easy to throw together and nobody can keep their hand out of the bowl!

I would, however, make one suggestion. Instead of putting all of the cereal in a large ziploc bag to coat with powdered sugar, I would recommend coating the cereal in smaller batches (1/3 of the cereal with 1/3 of the powdered sugar). I went the large ziploc bag route, and I found it difficult to coat the cereal evenly.

http://www.chex.com/images/BeautyShots275x200/r19919fp.jpg

Puppy Chow
(Source: Chex)

9 cups Corn, Rice, Wheat, or Chocolate Chex cereal (or combination)
1 cup semisweet chocolate chips (I used Milk chocolate chips)
1/2 cup peanut butter
1/4 cup butter or margarine
1 tsp vanilla
1 1/2 cups powdered sugar


1. In a large bowl, measure cereal; set aside.

2. In 1-quart microwavable bowl, microwave chocolate chips, peanut butter and butter uncovered on High 1 minute; stir. Microwave about 30 seconds longer or until mixture can be stirred smooth. Stir in vanilla. Pour mixture over cereal, stirring until evenly coated. Pour into 2-gallon resealable food-storage plastic bag.

3. Add powdered sugar. Seal bag; shake until well coated. Spread on waxed paper to cool. Store in airtight container in refrigerator.
 

Laura's Sweet Treats Copyright 2009 Sweet Cupcake Designed by Ipiet Templates Image by Tadpole's Notez